Creating a Piano Roll Control in WPF
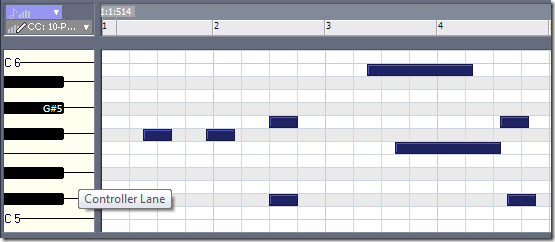
Those who work with MIDI data will know the importance of the "Piano Roll" view. This is a view that on the Y-axis shows the notes on a keyboard, while the X-axis represents time. The MIDI notes are then displayed as rectangles, which allows for a very intuitive editing experience. Here's a picture of the Piano Roll view in Cakewalk SONAR:
Now obviously, this type of view has many more uses. It can be used for any categorised display of time-based data, whether that be audio recordings or train timetables or any number of things.
Writing this type of "time-line" based view as a Windows Forms control is no mean feat, but the power of WPF means that we can get a basic piano roll control up and running with minimal effort.
We start by creating a WPF User Control that will be the main display area for our note data:
<UserControl x:Class="TestApp.PianoRoll"
    xmlns="http://schemas.microsoft.com/winfx/2006/xaml/presentation"
    xmlns:x="http://schemas.microsoft.com/winfx/2006/xaml"
    Height="300" Width="300">
    <Canvas x:Name="NoteCanvas" />
</UserControl>
All we have done so far is added a Canvas element called NoteCanvas. In the code behind for our PianoRoll control we are going to create a property that allows us to set the MIDI events we want to display. I am going to use my NAudio library to load the MIDI events from a standard MIDI file:
public partial class PianoRoll : UserControl
{
    MidiEventCollection midiEvents;
    double xScale = 1.0 / 10;
    double yScale = 15;

    public MidiEventCollection MidiEvents
    {
        get
        {
            return midiEvents;
        }
        set
        {
            // a quarter note is 20 units wide
            xScale = (20.0 / value.DeltaTicksPerQuarterNote);
            midiEvents = value;
            NoteCanvas.Children.Clear();

            long lastPosition = 0;
            for (int track = 0; track < midiEvents.Tracks; track++)
            {
                foreach (MidiEvent midiEvent in value[track])
                {
                    if (midiEvent.CommandCode == MidiCommandCode.NoteOn)
                    {
                        NoteOnEvent noteOn = (NoteOnEvent)midiEvent;
                        if (noteOn.OffEvent != null)
                        {
                            Rectangle rectangle = MakeNoteRectangle(noteOn.NoteNumber, noteOn.AbsoluteTime, noteOn.NoteLength, noteOn.Channel);
                            NoteCanvas.Children.Add(rectangle);
                            lastPosition = Math.Max(lastPosition, noteOn.AbsoluteTime + noteOn.NoteLength);
                        }
                    }
                }
            }
            this.Width = lastPosition * xScale;
            this.Height = 128 * yScale;
        }
    }
What is happening here is that when the MidiEvents property is passed a new MidiEventCollection, it clears everything from the canvas, and then goes through each "track", and for each NoteOnEvent that has a corresponding NoteOffEvent (which should be all of them but some MIDI files are badly formed), it creates a rectangle and adds it to the canvas.
The final thing that happens is the size of the UserControl (not the Canvas itself, which is quite happy to draw outside its own bounds) is adjusted to be big enough to display the entire MIDI file.
Here's the code that creates the Rectangle for a note. Each note has a height of 15 units, and its width is simply its length in MIDI ticks. However, I have used a horizontal scale factor to make the rectangle a more sensible size (making one quarter note 20 units wide):
private Rectangle MakeNoteRectangle(int noteNumber, long startTime, int duration, int channel)
{
    Rectangle rect = new Rectangle();
    if (channel == 10)
    {
        rect.Stroke = new SolidColorBrush(Colors.DarkGreen);
        rect.Fill = new SolidColorBrush(Colors.LightGreen);
        duration = midiEvents.DeltaTicksPerQuarterNote / 4;
    }
    else
    {
        rect.Stroke = new SolidColorBrush(Colors.DarkBlue);
        rect.Fill = new SolidColorBrush(Colors.LightBlue);
    }
    rect.Width = (double)duration * xScale;
    rect.Height = yScale;
    rect.SetValue(Canvas.TopProperty, (double)(127-noteNumber) * yScale);
    rect.SetValue(Canvas.LeftProperty, (double)startTime * xScale);
    return rect;
}
You will also notice that I have coloured notes differently on channel 10 (which by MIDI convention is for drums), and have normalised their lengths, as MIDI drum devices ignore note length and play the whole drum sample every time a NoteOn is triggered.
The Y position of each note is governed by the noteNumber, and we have reversed it so the low note numbers are at the bottom.
So now we have a very rudimentary Piano Roll display, we need to sort out scrollbars for it. For now, I have just put my piano roll control inside a scroll viewer. This gives a very simple way to let us scroll around. It is also the reason why we needed to resize our PianoRoll User Control when we added new events to it.
<ScrollViewer Margin="0,30,0,0" Name="scrollViewer1" Background="AliceBlue"
              HorizontalScrollBarVisibility="Auto"
              VerticalScrollBarVisibility="Auto">
    <me:PianoRoll x:Name="PianoRollControl" Background="Tan"
        Width="Auto" Height="Auto"/>
</ScrollViewer>
And that is all there is to it. The final piece is to write some code to load a MIDI file into our piano control when the user clicks a button and selects a file:
private void button1_Click(object sender, RoutedEventArgs e)
{
    OpenFileDialog openFileDialog = new OpenFileDialog();
    openFileDialog.Filter = "MIDI Files (*.mid)|*.mid|All Files (*.*)|*.*";
    openFileDialog.FilterIndex = 1;
    if (openFileDialog.ShowDialog().Value)
    {
        MidiFile midiFile = new MidiFile(openFileDialog.FileName);
        this.PianoRollControl.MidiEvents = midiFile.Events;
    }
}
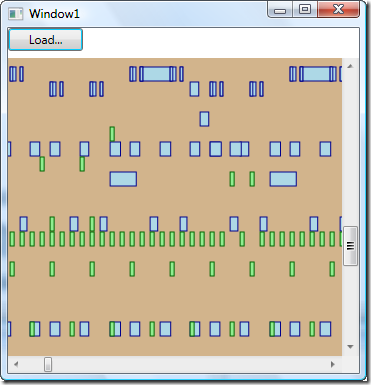
Now we can load any MIDI file in and see all the notes displayed in Piano Roll style:
Obviously there is still a way to go before this is a fully featured PianoRoll control. We need to add horizontal zooming (which is nice and easy thanks to the power of WPF RenderTransforms). We also need to add grid-lines, which again are very easy to do by adding another canvas for gridlines to our PianoRoll control. And of course the view of the piano on the left-hand side needs to be added, along with any capabilities for selecting and editing notes.
There may also be some slightly more clever ways of approaching this problem, perhaps using data-binding and making a custom layout control. And there may be performance issues to do with the number of items in the control, although I tested with several thousand without any noticeable problems.
But hopefully this post has shown just how easy it is to get started with this kind of rich user interface in WPF (or Silverlight), and perhaps I'll post again when I have enhanced the functionality of my Piano Roll control in the future.
 A place for me to share what I'm learning: Azure, .NET, Docker, audio, microservices, and more...

Comments
the source code would have been nice.
AnonymousI kind a new at wpf, so I have trouble implementing your sample.
Thanks.
Yeah, this was difficult to follow for several reasons:
Andrew1. I'm trying to use FMOD and not NAudio (so I had to closely study what parts to leave out and what parts to leave in).
2. I was trying to make this piano roll *in addition* to my form, NOT by starting out as a WPF project.
3. In the second XAML coding listed in this tutorial, the "
" is very confusing... Basically, this is what you want to do:
- Add a new item (WPF User Control) to your *form* project
- Change the XAML coding to this: "
"
- Go to your form's design, scroll all the way up in the *Toolbox* window, and insert a "Piano_Roll" (or whatever you called it) onto the form where you would like the piano roll to be
- Everything after that is self-explanatory.
Good luck! =)
hi, thanks for the tutorial. the pianoroll is well explained. however, the wpf part, which is not this tutorial is quite tricky for people used to forms. i have trouble piecing these code fragments, which code goes where... even getting the dialogresult.ok to work. i think it would be helpful if the csharp project can be downloaded. so we can study and enjoy a working example, instead figure out how to make it work in the first place.
makoto314