Creating a Piano Roll in WPF Part 2
In a previous post, I demonstrated how easy it was to create a very rudimentary piano roll view in WPF. In this post, I will take things a stage further by giving the piano roll a better background. To achieve this, I have made two changes to the PianoRoll User Control we made previously. First, I have moved the ScrollViewer in so that it now is part of the PianoRoll control itself. Second, I now have three sub-canvases that will build up the data view in the PianoRoll control. Here is the new XAML for the PianoRoll control:
<UserControl x:Class="TestApp.PianoRoll"
    xmlns="http://schemas.microsoft.com/winfx/2006/xaml/presentation"
    xmlns:x="http://schemas.microsoft.com/winfx/2006/xaml"
    Height="Auto" Width="Auto">
    <ScrollViewer
        x:Name="scrollViewer1"
        HorizontalScrollBarVisibility="Auto"
        VerticalScrollBarVisibility="Auto">
    <Canvas x:Name="RootCanvas" Background="White">
        <Canvas x:Name="NoteBackgroundCanvas">
            <Canvas.RenderTransform>
                <ScaleTransform
                     x:Name="NoteBackgroundRenderScaleTransform"
                     ScaleX="1" ScaleY="1" />
            </Canvas.RenderTransform>
        </Canvas>
        <Canvas x:Name="GridCanvas" />
        <Canvas x:Name="NoteCanvas" />
    </Canvas>
    </ScrollViewer>
</UserControl>
The NoteBackgroundCanvas is used for drawing the horizontal lines that divide each of the 128 MIDI notes. We will also shade the lines that represent "black notes" on the piano slightly. Each of these horizontal lines we will simply make one unit wide, and a ScaleTransform will be used to ensure that they stretch the required amount. Here's the code that populates the background canvas.
private void CreateBackgroundCanvas()
{
    for (int note = 0; note < 128; note++)
    {
        if((note % 12 == 1) // C#
         ||(note % 12 == 3) // Eb
         ||(note % 12 == 6) // F#
         ||(note % 12 == 8) // Ab
         ||(note % 12 == 10)) // Bb
        {
            Rectangle rect = new Rectangle();
            rect.Height = yScale;
            rect.Width = 1;
            rect.Fill = blackNoteChannelBrush;
            rect.SetValue(Canvas.TopProperty, GetNoteYPosition(note));
            NoteBackgroundCanvas.Children.Add(rect);
        }
    }
    for (int note = 0; note < 128; note++)
    {
        Line line = new Line();
        line.X1 = 0;
        line.X2 = 1;
        line.Y1 = GetNoteYPosition(note);
        line.Y2 = GetNoteYPosition(note);
        line.Stroke = noteSeparatorBrush;
        NoteBackgroundCanvas.Children.Add(line);
    }
}
On top of the background canvas comes the GridCanvas. This contains the vertical lines showing where each measure and beat start. We can't draw this until we have loaded the MIDI events because we need to know how many MIDI ticks are in each quarter note, and also we need to know how many grid lines to draw. Here is the code that draws the grid.
private void DrawGrid()
{
    GridCanvas.Children.Clear();
    int beat = 0;
    for (long n = 0; n < lastPosition; n += midiEvents.DeltaTicksPerQuarterNote)
    {
        Line line = new Line();
        line.X1 = n * xScale;
        line.X2 = n * xScale;
        line.Y1 = 0;
        line.Y2 = 128 * yScale;
        if (beat % 4 == 0)
        {
            line.Stroke = measureSeparatorBrush;
        }
        else
        {
            line.Stroke = beatSeparatorBrush;
        }
        GridCanvas.Children.Add(line);
        beat++;
    }
}
The final change is to the drawing of the notes themselves. They are now drawn onto the NoteCanvas. When drawing is finished, the RootCanvas now must be resized rather than the UserControl because it is the RootCanvas that is the child element of the ScrollViewer. Finally, we need to adjust the scale transform on the NoteBackgroundCanvas to ensure that the horizontal lines and bars extend the whole way across.
private void DrawNotes()
{
    NoteCanvas.Children.Clear();

    NoteCanvas.Children.Add(MakeNoteRectangle(0, 0, midiEvents.DeltaTicksPerQuarterNote, 0));
    for (int track = 0; track < midiEvents.Tracks; track++)
    {
        foreach (MidiEvent midiEvent in midiEvents[track])
        {
            ...  // create note rectangles
        }
    }
    RootCanvas.Width = lastPosition * xScale;
    RootCanvas.Height = 128 * yScale;
    NoteBackgroundRenderScaleTransform.ScaleX = RootCanvas.Width;
}
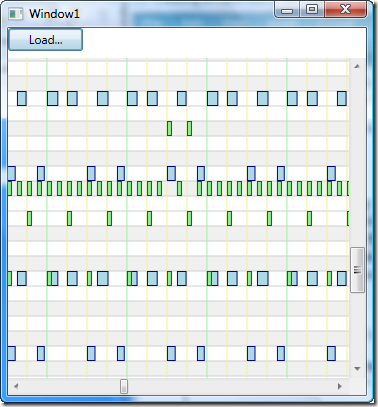
And here's what the PianoRoll control looks like now:
A nice improvement on before. The next stage will be to add horizontal zooming support and display the piano keyboard on the left.
 A place for me to share what I'm learning: Azure, .NET, Docker, audio, microservices, and more...
Comments
Thanks Mark for the informative post. I am currently developing a small application to be able to "view" all the MIDI pattern I've got in my Sonar library, to help selecting the right one. Doing this part time so it'll probably take a while but your NAudio library and the two posts on Piano Roll will certainly help!
SylI concur with Syl, and will take advantage of this occasion to tip you my (worn out) hat regarding the NAudio piece of work, that I'm trying to use for Midi related applets.
Mike RoyAny chance you could post the working project related to this 'piano roll' control? Being an admitted newbie regarding WPF, it would probably supply me loads of enlightning info regarding project structuring.
Thanks, and keep it up!
Regards,