Creating Resizable Shape Controls in WPF
In WPF, you can create a resizable shape by using the Path control. Simply set up your shape’s path data and then set the Stretch property to Fill and your shape will resize itself to fit the space available. It even takes into account the stroke thickness.
But what if you want a shape that resizes differently? For example, you might want the corner radius of a rounded corner to stay constant, irrespective of how wide or tall you made your shape. In that case, things get quite a bit more complicated as you can’t use the Stretch=Fill technique.
I’ve recently built a small open source library of useful WPF shapes (available on NuGet), and in this post, I’ll briefly explain how to make your own resizable WPF shape.
Custom Shape Using Stretch.Fill
The first and simplest example is a shape that does use Stretch.Fill. If proportional stretching is all you want, then this is the simplest way to do it. Here’s a simple diamond (rhombus) shape:
public class Diamond : Shape
{
    public Diamond()
    {
        this.Stretch = Stretch.Fill;
    }

    protected override Geometry DefiningGeometry
    {
        get { return GetGeometry(); }
    }

    private Geometry GetGeometry()
    {
        return Geometry.Parse("M 100, 0 l 100, 100 l -100, 100 l -100, -100 Z");
    }
}
There are only two things we needed to do. First is to set the Stretch property to Fill by default, saving the users of our control the need to do that in XAML. And then override the DefiningGeometry. I like to use the XAML Path mini-language as I find it to be easy to use. Here I just draw a diamond, using “Z” to close the shape at the end. It doesn’t matter what size I draw the shape, since we are stretching to fit.
Adding Custom Properties
Another useful thing to be able to do is add custom properties to your Shape object. These should be dependency properties to fully benefit from the power of the WPF framework. For example, in my Triangle shape, I added a TriangleOrientation property that allows you to select what direction your triangle is pointing in.
public enum Orientation
{
    N,
    NE,
    E,
    SE,
    S,
    SW,
    W,
    NW
}

public Orientation TriangleOrientation
{
    get { return (Orientation)GetValue(TriangleOrientationProperty); }
    set { SetValue(TriangleOrientationProperty, value); }
}

// Using a DependencyProperty as the backing store for TriangleOrientation.  This enables animation, styling, binding, etc...
public static readonly DependencyProperty TriangleOrientationProperty =
    DependencyProperty.Register("TriangleOrientation", typeof(Orientation), typeof(Triangle), new UIPropertyMetadata(Orientation.N, OnOrientationChanged));

private static void OnOrientationChanged(DependencyObject d, DependencyPropertyChangedEventArgs ek)
{
    Triangle t = (Triangle)d;
    t.InvalidateVisual();
}
Calling InvalidateVisual when the TriangleOrientation property changes causes DefiningGeometry to be called again. Now we simply have to return the correct geometry for the selected orientation:
private Geometry GetGeometry()
{
    string data;
    if (TriangleOrientation == Orientation.N)
        data = "M 0,1 l 1,1 h -2 Z";
    else if (TriangleOrientation == Orientation.NE)
        data = "M 0,0 h 1 v 1 Z";
    else if (TriangleOrientation == Orientation.E)
        data = "M 0,0 l 1,1 l -1,1 Z";
    else if (TriangleOrientation == Orientation.SE)
        data = "M 1,0 v 1 h -1 Z";
    else if (TriangleOrientation == Orientation.S)
        data = "M 0,0 h 2 l -1,1 Z";
    else if (TriangleOrientation == Orientation.SW)
        data = "M 0,0 v 1 h 1 Z";
    else if (TriangleOrientation == Orientation.W)
        data = "M 0,1 l 1,1 v -2 Z";
    else
        data = "M 0,0 h 1 l -1,1 Z";
    return Geometry.Parse(data);
}
Controlling Resize Behaviour
As I mentioned at the start, controlling resize behaviour unfortunately is not nearly so simple. My first attempt was to use the control’s ActualHeight and ActualWidth property, or the RenderSize property while I created the DefiningGeometry. But that actually caused really strange resize behaviour with the shape growing larger as you resized the control smaller.
The trouble is caused by the fact that the parent container is asking the Shape “how much space do you need?” and the shape is asking the container “how much space have you got?”. Someone needs to make a decision what the size will be. The solution is for our Shape to say that it will take up the full amount of space it is being offered, by overriding MeasureOverride to simply pass back the constraint we are given:
protected override Size MeasureOverride(Size constraint)
{
    // we will size ourselves to fit the available space
    return constraint;
}
Now in the Geometry method, we can examine the ActualWidth and ActualHeight properties and use those to know how much space we have to draw the shape in. Unfortunately, we have to take the StrokeThickness into account ourselves, so make sure you leave a margin round the edge of at least StrokeThickness / 2 (it may even need to be more depending on your line join style and the angle of line joins). Here’s the code for my Label control, which is a rectangle with the top left and bottom left corners cut off. It has a CornerWidth dependency property to define the amount of corner to cut off, which stays constant however big you resize the control:
private Geometry GetGeometry()
{
    double cornerWidth = CornerWidth;
    double width = ActualWidth - StrokeThickness;
    double height = ActualHeight - StrokeThickness;

    return Geometry.Parse(String.Format("M {0},{1} h {3} v {4} h -{3} l -{2},-{2} v -{5} Z",
        cornerWidth + StrokeThickness/2, StrokeThickness/2, cornerWidth, width-cornerWidth, height, height-(2 * cornerWidth)));
}
Try it out
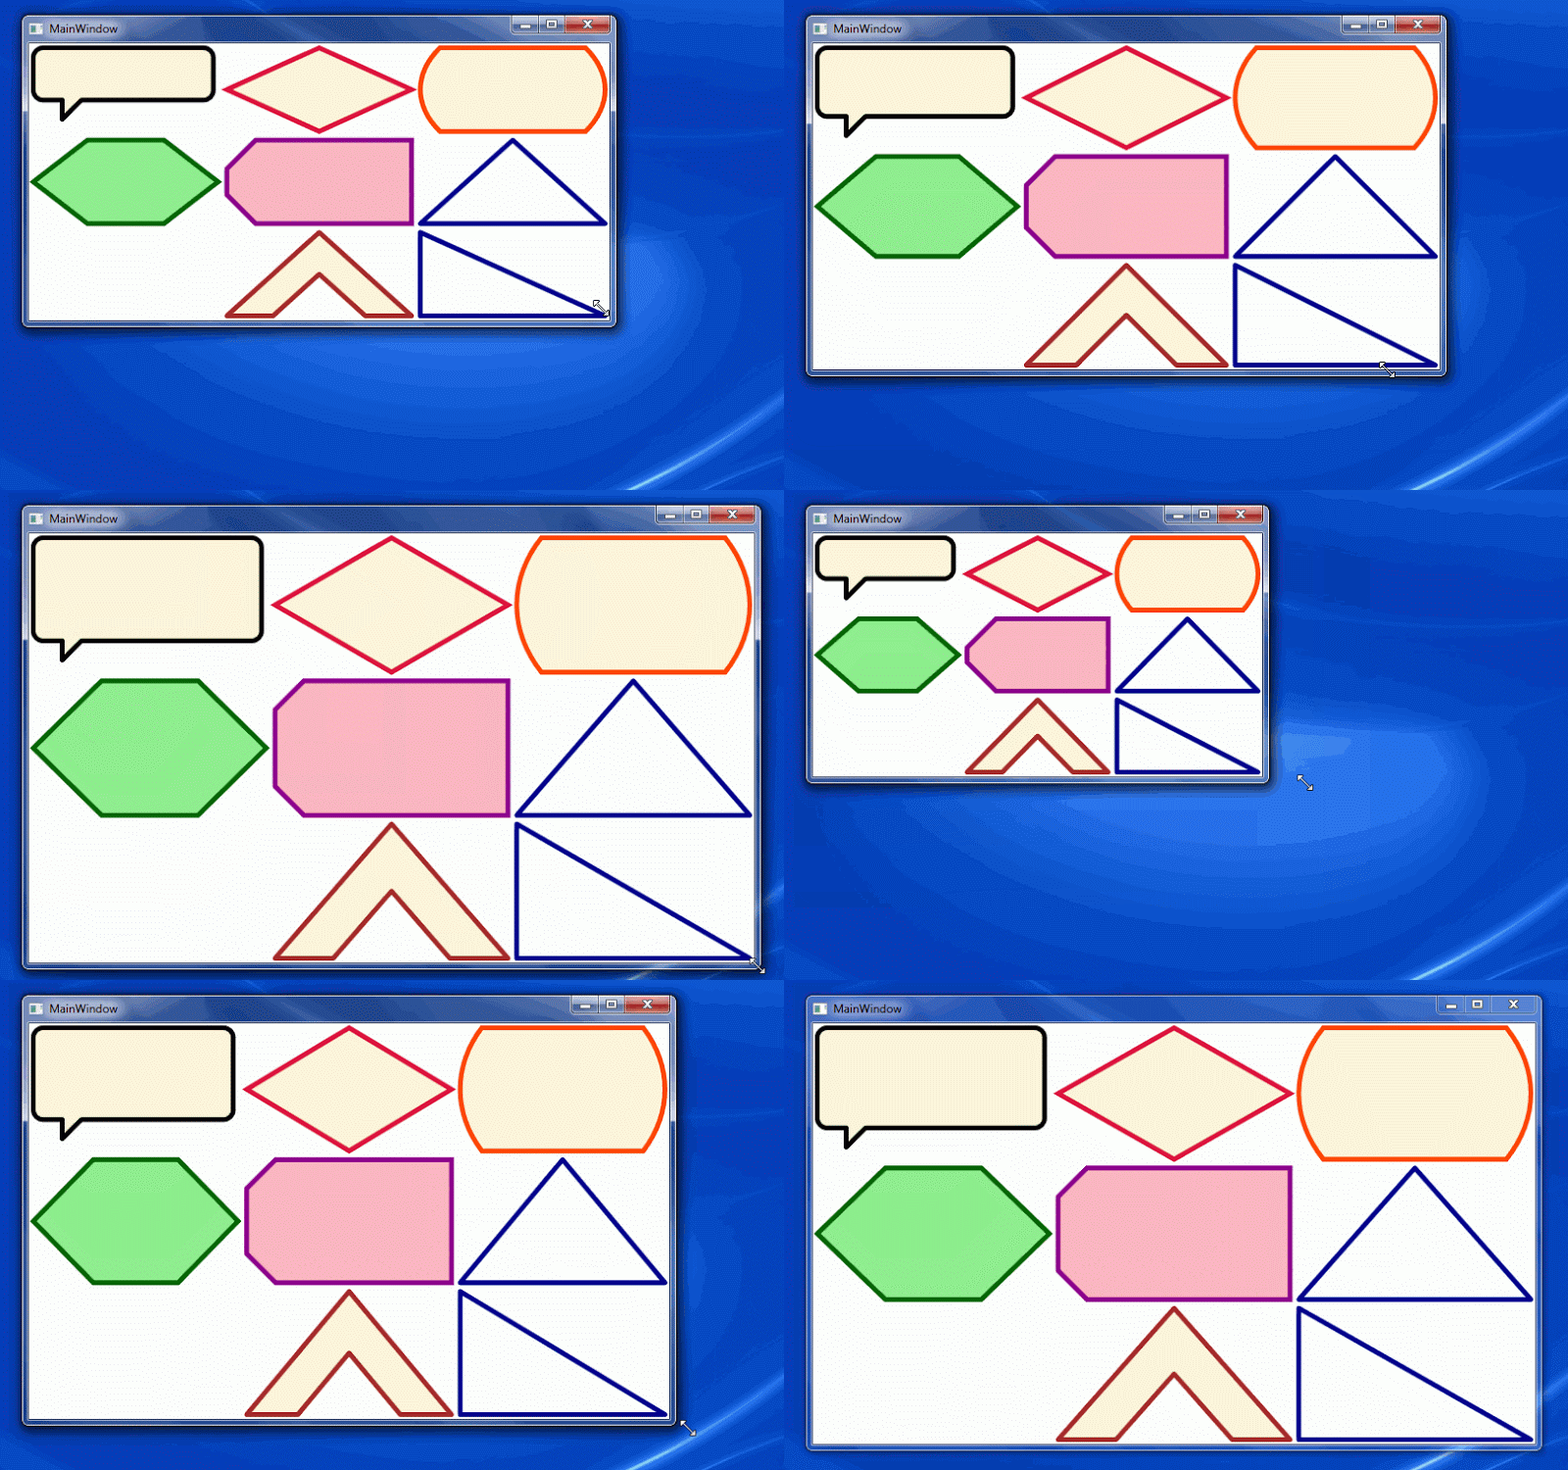
You are welcome to try my shapes out for yourself. The code is available on CodePlex. I welcome any contributions to the library either of new shapes, or adding some more dependency properties onto the existing shapes to allow for better customisation. The current shapes are Speech Bubble, Diamond, Rounded Sides Rectangle, Hexagon, Label, Triangle (available in several orientations) and Chevron. Here’s what the shapes in the first version look like being resized:
 A place for me to share what I'm learning: Azure, .NET, Docker, audio, microservices, and more...