Visual Studio 2019 Docker Tooling
In this post I want to give an overview of what happens when you turn on the Docker tooling in Visual Studio 2019. If you're like me, you want to know a bit about what will happen under the hood before using a feature like this. I have questions like, "what changes will be made to my project files?", "will I still be able to run the projects normally (i.e. not containerized)?", "what about team members using VS Code instead?"
So for those who have not yet dived deeply into the world of containers yet, here's a basic guide to how you can try it out yourself for a very simple "microservices" application.
Demo scenario
To start with, let's set up a very simple demo scenario. We'll create a Visual Studio solution that has two web apps which will be our "microservices".
dotnet new web -o Microservice1
dotnet new web -o Microservice2
dotnet new sln
dotnet sln add Microservice1
dotnet sln add Microservice2
And optionally we can update the Startup.Configure method to help us differentiate between the two microservices:
app.UseEndpoints(endpoints =>
{
    endpoints.MapGet("/", async context =>
    {
        await context.Response.WriteAsync("Hello from Microservice1!");
    });
});
Launch Profiles
The "traditional" way to launch multiple microservices in Visual Studio to would be to go to "Project | Set Startup Projects..", select "Multiple Startup Projects" and set both microservices to "Start".
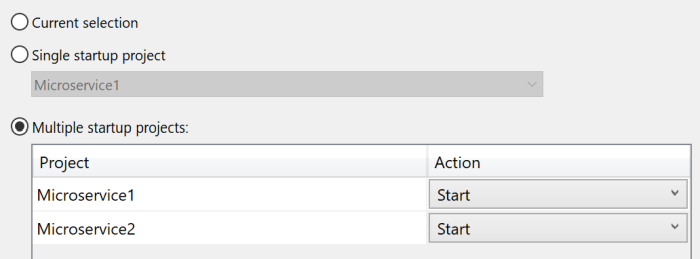
Now when we run in VS2019, by default, our two microservices will run hosted by IIS Express. Mine started up on ports 44394 and 44365, and you can see configured port numbers in the Properties/launchSettings.json file for each microservice.
Here's an example, and you'll notice that out of the box I've got two "profiles" - one that runs using IIS Express, and one (called "Microservice1") that uses dotnet run to host your service on Kestrel.
{
  "iisSettings": {
    "windowsAuthentication": false,
    "anonymousAuthentication": true,
    "iisExpress": {
      "applicationUrl": "http://localhost:7123",
      "sslPort": 44365
    }
  },
  "profiles": {
    "IIS Express": {
      "commandName": "IISExpress",
      "launchBrowser": true,
      "environmentVariables": {
        "ASPNETCORE_ENVIRONMENT": "Development"
      }
    },
    "Microservice1": {
      "commandName": "Project",
      "dotnetRunMessages": "true",
      "launchBrowser": true,
      "applicationUrl": "https://localhost:5001;http://localhost:5000",
      "environmentVariables": {
        "ASPNETCORE_ENVIRONMENT": "Development"
      }
    }
  }
}
If we were to run our two microservices directly from the command-line with dotnet run, they would not use IIS Express, and we'd find that only one of the two would start up as they'd both try to listen on port 5001. There are a few options for overriding this when you are running from the command-line, but since this post is about Visual Studio, let's see how we can select which profile each of our microservices uses.
To change the launch profile for a project, first we need to right-click on that project in the Solution Explorer and choose "Set as Startup Project" (n.b. I'm sure there must be a way to do this without switching away from multiple startup projects, but I haven't found it if there is!).
This will give us access to a drop-down menu in the Visual Studio command bar which lets us switch between IIS Express and directly running the project (which shows with the name of the project so Microservice1 in this example).
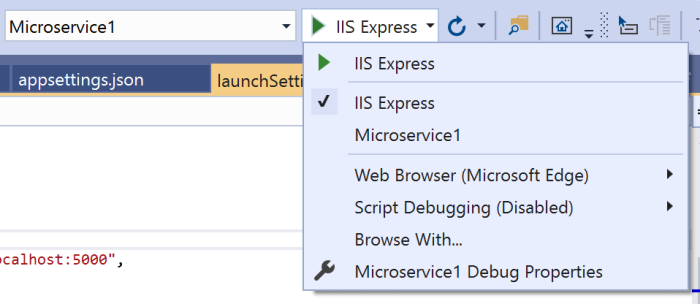
Once we have done this for both microservices, we can change back to multiple startup projects, and we need to make one final change, modifying the applicationUrl setting in launchSettings.json for Microservice2 so that it doesn't clash with Microservice1. I've chosen ports 5002 and 5003 for this example:
"Microservice2": {
    "commandName": "Project",
    "dotnetRunMessages": "true",
    "launchBrowser": true,
    "applicationUrl": "https://localhost:5003;http://localhost:5002",
    "environmentVariables": {
    "ASPNETCORE_ENVIRONMENT": "Development"
    }
}
Now when we run in VS2019, we'll see two command windows that run the microservices directly with dotnet run and both services can run simultaneously. If they wanted to communicate with each other, we'd need to give them application settings holding the URL and port numbers they can use to find each other.
All that was just a bit of background on how to switch between launch profiles, but it's useful to know as there'll be a third option when we enable Docker.
Enabling Docker for a Project
In order to use Docker support for VS2019, you obviously do need Docker Desktop installed and running on your PC. I have mine set to Linux container mode and running on WSL2.
Once we have Docker installed and running, then we can right-click Microservice1 in the Solution Explorer, and select "Add | Docker Support...".
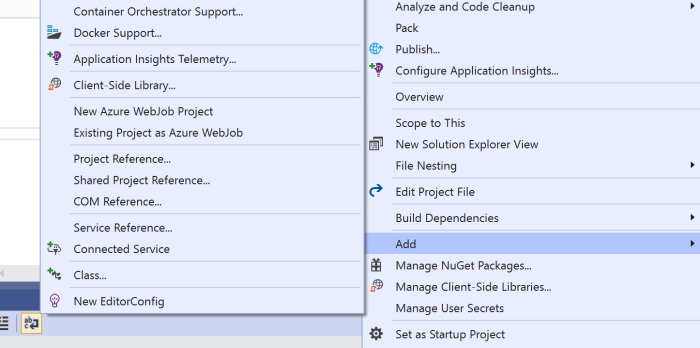
This will bring up a dialog letting you choose either Linux or Windows as the Target OS. I went with the default of Linux.
Once you do this, several things will happen.
First, a Dockerfile is created for you. Here's the one it created for my microservice:
#See https://aka.ms/containerfastmode to understand how Visual Studio uses this Dockerfile to build your images for faster debugging.

FROM mcr.microsoft.com/dotnet/aspnet:5.0-buster-slim AS base
WORKDIR /app
EXPOSE 80
EXPOSE 443

FROM mcr.microsoft.com/dotnet/sdk:5.0-buster-slim AS build
WORKDIR /src
COPY ["Microservice1/Microservice1.csproj", "Microservice1/"]
RUN dotnet restore "Microservice1/Microservice1.csproj"
COPY . .
WORKDIR "/src/Microservice1"
RUN dotnet build "Microservice1.csproj" -c Release -o /app/build

FROM build AS publish
RUN dotnet publish "Microservice1.csproj" -c Release -o /app/publish

FROM base AS final
WORKDIR /app
COPY --from=publish /app/publish .
ENTRYPOINT ["dotnet", "Microservice1.dll"]
What's nice about this Dockerfile is that it's completely standard. It's not a special "Visual Studio" Dockerfile. It's just the same as you would use if you were working from Visual Studio Code instead.
The next change of note is to our csproj file. It's added a UserSecretsId which is is a way to help us keep secrets out of source code in a development environment. It's also set the DockerDefaultTargetOS to Linux which was what we selected.
But notice that we've also now got a reference to the Microsoft.VisualStudio.Azure.Containers.Tools.Targets NuGet package.
<Project Sdk="Microsoft.NET.Sdk.Web">

  <PropertyGroup>
    <TargetFramework>net5.0</TargetFramework>
    <UserSecretsId>2e9eb51f-13b8-406a-9735-92c975674696</UserSecretsId>
    <DockerDefaultTargetOS>Linux</DockerDefaultTargetOS>
  </PropertyGroup>

  <ItemGroup>
    <PackageReference Include="Microsoft.VisualStudio.Azure.Containers.Tools.Targets" Version="1.10.9" />
  </ItemGroup>

</Project>
This new package reference might make you a bit nervous. Does this mean that we can now only build our application with Visual Studio, or only build on a machine that has Docker installed? Has it made our microservice somehow dependent on Docker in order to run successfully?
The answer is fortunately no to each of those questions. All that this package does is that it will build a container image when we build our project in Visual Studio.
If we issue a docker image ls command we'll see that there is now a microservice1 docker image tagged dev. This is what Visual Studio will use to run our microservice in a container.

However, if you issue a docker ps command which shows you running containers, you might be surprised to see that this container is already running, despite not having started debugging yet.

What's going on here? Why is Visual Studio running my microservice without me asking it to? The answer is, this container isn't actually running microservice1 yet. Instead it is a pre-warmed container that Visual Studio has already started to speed up the development loop of working with containerized projects.
You can learn more about this at the link provided at the top of the auto-generated Dockerfile. There's lots of excellent information in that document, so make sure you take some time to read through it.
The basic takeaway is that this container uses volume mounts so that whenever you build a new version of your code, it doesn't need to create a new Docker image. The existing container that is already running will simply start running your code, which is in a mounted volume.
You can use the docker inspect command to see details of the mounted volumes, but again there is a helpful breakdown available here explaining what each one is for. There are mounts for your source code, the compiled code, and NuGet packages for example.
If you exit Visual Studio it will clean up after itself and remove this container, so if you do a docker ps -a you should no longer see the microservice1 container.
Before we see how to run, let's just quickly look at the two other changes that happened when we enabled Docker support for the service.
The first is that a new profile has been added to the launchSettings.json file that we saw earlier. This means that for each project in our solution that we enable Docker support for, we can either run it as a Docker container, or switch back to one of the alternatives (IIS Express or dotnet run) if we prefer.
"Docker": {
    "commandName": "Docker",
    "launchBrowser": true,
    "launchUrl": "{Scheme}://{ServiceHost}:{ServicePort}",
    "publishAllPorts": true,
    "useSSL": true
}
Finally, it also helpfully creates a .dockerignore file for us which protects our Docker images from being bloated or unintentionally containing secrets.
Running from Visual Studio
So far we've only converted one of our microservices to use Docker, but we can still run both of them if we have the "multiple startup projects" option selected. Each project simply uses the launch profile that's selected, so can run one microservice as a Docker container and one with dotnet run or IIS Express if we want.
The obvious caveat here is that each technique for starting microservices (IIS Express, Docker, dotnet run) will use a different port number. So if your microservices need to communicate with each other you'll need some kind of service discovery mechanism. Tye is great for this, but that's a post for another day. By the end of this post we'll see Docker Compose in action which gives us a nice solution to this problem.
While you're running the application, you can check out the container logs using the excellent Visual Studio Container window. This not only lets you see the logs, but also the environment variables, browse the file system, see which ports are in use and connect to the container in a terminal window.
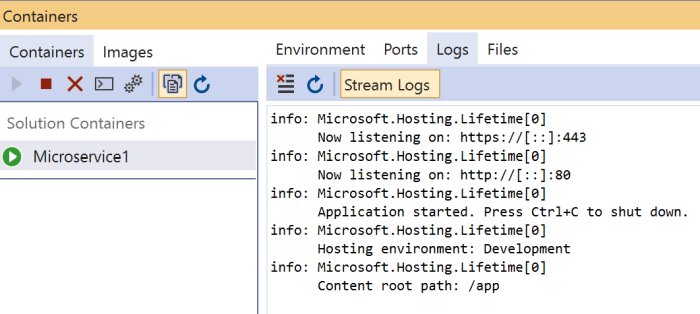
The debugger is also set up automatically attach to the code running in the container, so we can set breakpoints exactly as though we were running directly on our local machine.
Container orchestration
If you are building a microservices application, then you likely have several projects that need to be started, as well as possibly other dependent containerized services that need to run at the same time. A common approach is to use a Docker Compose YAML file to set this up, and again Visual Studio can help us with this.
I've added "Docker Support" to my second microservice using the same technique described above, and now we can add "Container Orchestrator" support by right-clicking on one of our microservices and selecting "Add | Container Orchestrator Support...".

Next, we will be asked which container orchestrator we want to use. This can either be "Kubernetes/Helm" or "Docker Compose". Kubernetes is an increasingly common choice for hosting containers in production and Docker Desktop does allow you to run a single-node local Kubernetes cluster. However, I think for beginners to Docker, the Docker Compose route is a little simpler to get started with, so I'll choose Docker Compose.

We'll again get prompted to choose an OS - I chose Linux as that's what I chose for the Docker support.
Let's look at what gets created when I add Docker Compose support. First, a new project is added to my solution, which is a "Docker Compose" project (.dcproj):
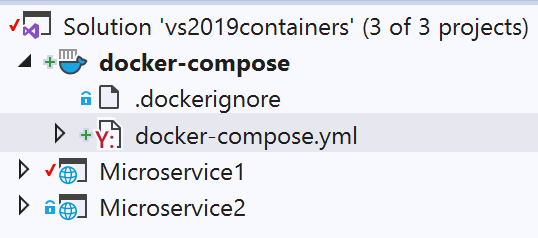
The project includes an auto-generated docker-compose.yml file. A Docker Compose file holds a list of all the containers that you want to start up together when you run your microservices application. This can be just your own applications, but can also include additional third-party containers you want to start at the same time (e.g. a Redis cache).
Here, the created Docker Compose file is very simple, just referencing one microservice, and indicating where the Dockerfile can be found to enable building:
version: '3.4'

services:
  microservice1:
    image: ${DOCKER_REGISTRY-}microservice1
    build:
      context: .
      dockerfile: Microservice1/Dockerfile
There is also a docker-compose.override.yml file. An override file allows you to specify additional or alternative container settings that apply to a specific environment. So you could have one override file for local development, and one for production. Here, the override file is specifying the environment variables we want to set, the ports we want to expose and the volumes that should be mounted.
version: '3.4'

services:
  microservice1:
    environment:
      - ASPNETCORE_ENVIRONMENT=Development
      - ASPNETCORE_URLS=https://+:443;http://+:80
    ports:
      - "80"
      - "443"
    volumes:
      - ${APPDATA}/Microsoft/UserSecrets:/root/.microsoft/usersecrets:ro
      - ${APPDATA}/ASP.NET/Https:/root/.aspnet/https:ro
The other small change, is that our microservice .csproj file has been updated with a reference to the Docker Compose project:
<DockerComposeProjectPath>..\docker-compose.dcproj</DockerComposeProjectPath>
If we do the same for microservice2, and add container orchestration support, it simply will update our Docker Compose file with an additional entry:
version: '3.4'

services:
  microservice1:
    image: ${DOCKER_REGISTRY-}microservice1
    build:
      context: .
      dockerfile: Microservice1/Dockerfile

  microservice2:
    image: ${DOCKER_REGISTRY-}microservice2
    build:
      context: .
      dockerfile: Microservice2/Dockerfile
The other change that has happened, is that we've now gone back to having a single "startup project". However, this startup project is the Docker Compose project, so when we start debugging in Visual Studio, it will launch all of the services listed in our Docker Compose file.
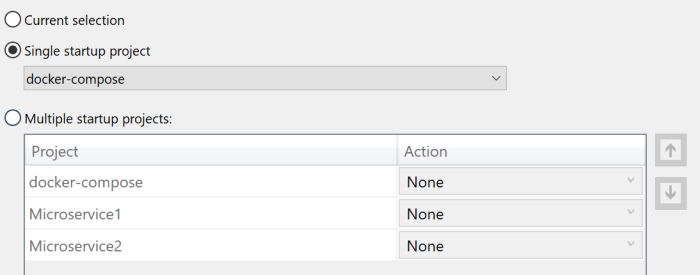
And when we start debugging, there will simply be one container running for each of the services in the Docker Compose YAML file.

Running with Docker Compose may seem similar to simply starting multiple projects, but it does offer some additional benefits.
First, Docker Compose will run the containers on the same Docker network, enabling them to communicate easily with each other. They can refer to each other by name as Docker Compose gives them a hostname the same as the container name. This means microservice1 could call microservice2 simply at the address http://microservice2.
Second, we are free to add additional dependent services to our Docker Compose file. In .NET applications, a very common required dependency is a SQL database, and I wrote a tutorial on containerizing SQL Server Express that explains how you can do that.
Summary
In this post we've seen that it's very straightfoward to add Container and Container Orchestrator support to a Visual Studio project. But I've also hopefully shown that you don't necessarily have to go all in on this if you're new to Docker and just want to experiment a bit.
If you have other team members who do not have Docker installed, they can simply continue building and running the services in the usual way. And if they don't want to use the Visual Studio tooling, they can still use regular Docker (and Docker Compose) commands to build and run the containers from the command line.
 A place for me to share what I'm learning: Azure, .NET, Docker, audio, microservices, and more...
Comments
How to stop the docker-compose! it seems to just keep running! ?
David Manning