Four Ways to Deploy an ASP.NET Core 2 Website in Azure
In this post I’m going to demonstrate four super easy ways to deploy a ASP.NET Core website in Azure. For the demo website we’ll use Mads Kristensen’s Miniblog.Core ASP.NET Core 2 blogging engine. (It’s the successor to Miniblog which I used as the basis for this site). And we’ll of course use the Azure CLI to automate the process.
Method 1 – WebApp deploy from GitHub
This first technique creates an Azure WebApp, and sets it up to deploy from a GitHub repository (this is the technique I used in my post on how to connect a WebApp to a SQL Database with the Azure CLI)
We create a resource group, an app service plan, and a web app using the Azure CLI. Then we set it up to point directly to the Miniblog.Core GitHub repository.
# create a resource group
$location = "westeurope"
$resourceGroup = "miniblogcore"
az group create -l $location -n $resourceGroup

# create an app service plan
$planName="miniblogcore"
az appservice plan create -n $planName -g $resourceGroup -l $location --sku B1

# create a web app
$appName="miniblogcore1"
az webapp create -n $appName -g $resourceGroup --plan $planName

# deploy from GitHub
$gitrepo="https://github.com/madskristensen/Miniblog.Core"
az webapp deployment source config -n $appName -g $resourceGroup `
    --repo-url $gitrepo --branch master --manual-integration

# launch the website in a browser
$site = az webapp show -n $appName -g $resourceGroup --query "defaultHostName" -o tsv
Start-Process https://$site
This works nice and easy, although the deployment stage takes a minute or two as the code has to be built on the server. But once that’s done we can see our site running in Azure:
So that was easy, but let’s see another approach.
Method 2 – Kudu Zip Deploy
I blogged recently about how you can deploy web apps with the new Kudu Zip API and the good news is that since I posted that, a new Azure CLI command has been added that makes it even easier.
First of all we need to create the zip file to deploy. This will basically be the output of a call to dotnet publish for our application. Here’s a PowerShell script to create publish.zip:
pushd src
$publishFolder = "publish"

# delete any previous publish
if(Test-path $publishFolder) {Remove-Item -Recurse -Force $publishFolder}

dotnet publish -c release -o $publishFolder

$destination = "publish.zip"
if(Test-path $destination) {Remove-item $destination}
Add-Type -assembly "system.io.compression.filesystem"
[io.compression.zipfile]::CreateFromDirectory($publishFolder, $destination)
Now we have our publish.zip file, we’ll create a new web app to deploy it to (we’ll call this “miniblogcore2”) and then use the new az webapp deployment source config-zip command to deploy it.
# create a new webapp
$appName2="miniblogcore2"
az webapp create -n $appName2 -g $resourceGroup --plan $planName

# deploy publish.zip using the kudu zip api
az webapp deployment source config-zip -n $appName2 -g $resourceGroup --src $destination

# launch the site in a browser
$site2 = az webapp show -n $appName2 -g $resourceGroup --query "defaultHostName" -o tsv
Start-Process https://$site2
This is much faster since than the Git deploy since we’re just uploading the compiled assets. It looks (unsurprisingly) exactly the same except for the URL, but we can see it’s up and running immediately.
So that’s two really easy ways to deploy your ASP.NET Core web app, but both of them are hosted on Windows. What if we wanted to take advantage of the cross-platform capabilities of ASP.NET Core and run a Linux build instead? Well, we can do that with Docker…
Method 3 – Docker Containers and App Service on Linux
To deploy Miniblog as a container, we’ll need to create a Dockerfile for it. This is quite easy to set up as you can copy the example Dockerfile suggested by Docker, and just change the name of the ENTRYPOINT DLL (make sure you get the casing correct!):
FROM microsoft/aspnetcore-build:2.0 AS build-env
WORKDIR /app

# Copy csproj and restore as distinct layers
COPY *.csproj ./
RUN dotnet restore

# Copy everything else and build
COPY . ./
RUN dotnet publish -c Release -o out

# Build runtime image
FROM microsoft/aspnetcore:2.0
WORKDIR /app
COPY --from=build-env /app/out .
ENTRYPOINT ["dotnet", "Miniblog.Core.dll"]
It’s also recommended that you add a .dockerignore file with the following contents:
bin\
obj\
Both the Dockerfile and .dockerignore file should go in the src folder alongside the Miniblog.Core.csproj file for this example.
Now, from within the src folder, we can build our Docker image. I’ve got Docker for Windows installed, but I switched to Linux containers before running these commands, as we will need a Linux image. However, you can build a Windows container with the same Dockerfile that will work just as well.
$dockerRepo = "markheath/miniblogcore:v1-linux"
docker build -t $dockerRepo .
Let’s test it locally before deploying to Azure. We can start it up like this:
docker run -d -p 8080:80 --name miniblogcore $dockerRepo
And sure enough, we’ve got Miniblog.Core running in a Linux Docker container locally
Now to deploy this to Azure, I need to host the image online somewhere. I’ve created a free account at DockerHub, so I can log in, and push the repository online like this:
docker login
docker push $dockerRepo
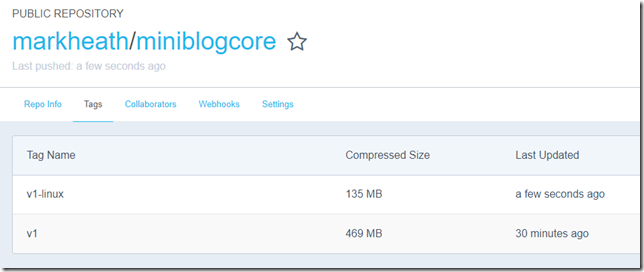
And we can see it online at my DockerHub page:
By the way, the first time I did this I accidentally built a Windows container (tagged as “v1”), so I had to push again (with the “v1-linux” tag). Here’s the two containers and you can see that Linux offers us a much leaner container size:
Now we’ve got a Docker image for our web app, we can host it on a Linux App Service. To do that we need to create a new Linux based app service plan. Let’s use the Azure CLI to create a new resource group and Linux app service plan:
$resourceGroup = "miniblogcorelinux"
az group create -l $location -n $resourceGroup

$planName="miniblogcorelinux"
az appservice plan create -n $planName -g $resourceGroup -l $location --is-linux --sku B1
Creating the web app is really easy. Just provide it the name of the repository (markheath/miniblogcore:v1-linux) with the -i argument when we call az webapp create.
# create a new webapp based on our DockerHub image
$appName3="miniblogcore3"
az webapp create -n $appName3 -g $resourceGroup --plan $planName -i $dockerRepo

# launch in a browser
$site3 = az webapp show -n $appName3 -g $resourceGroup --query "defaultHostName" -o tsv
Start-Process https://$site3
Again, this is quick and we have a working webapp running our Docker container on Linux:
Now, my example shows us using a public GitHub Docker repository, but you may want to set up continuous deployment from a private repository. The az webapp deployment container config and az webapp config container commands can be used to set up continuous deployment from a container image. This article goes into more detail on using custom Docker images with App Service on Linux.
Method 4 – Azure Container Instances
The first three techniques have used Azure App Service, but now we have a Docker image for our ASP.NET Core app, we can host it anywhere that can run Docker containers. Azure has a whole host of ways we can do this including Azure Container Services, Service Fabric, or simply running Docker in a VM, but one of the quickest options to get up and running is Azure Container Instances.
It’s really easy to create a container instance. I’ll put one in the resource group we already created and use the Miniblog.Core Docker image we built for the previous example (markheath/miniblogcore:v1-linux)
$appName4="miniblogcore4"
az container create --name $appName4 --image $dockerRepo --resource-group $resourceGroup --ip-address public --ports 80
Now we just need to find its public IP address and launch a browser:
$site4 = az container show --name $appName4 --resource-group $resourceGroup --query "ipAddress.ip" -o tsv
Start-Process http://$site4
And sure enough we now have Miniblog running in an Azure Container Instance:
Which One Should I Use?
All four of these options are easy to get up and running with. Your main choices revolve around whether you want to use Azure App Service, which contains lots of rich features like staging slots and easy custom domain name management, or if you want to go the Docker route which would make sense if your web app was part of a larger ecosystem of Docker containers.
If you’re planning to run your blog long-term Azure Container Instances is probably not the best choice as it is slightly more expensive than just running your own VM with Docker or using App Service on Linux. ACI’s strength is how quick and easy it is to just launch a container for short term use. So if you’re going the Docker route, App Service on Linux would be a better choice.
Another caveat is that Miniblog.Core simply uses XML files in the “posts” folder under wwwroot as a database. Generally with Docker, its not a good idea for your app container to also store the data, as it means you when you want to upgrade you’d also need to get the posts folder content into the new container image. So if you go with Docker, you’d want to expose the posts folder as a “volume” allowing its contents to persist when you update the container image. Obviously this is only an issue if your container stores data on its own disk rather than having a database connection string it is using.
I hope you found this helpful. These certainly aren’t the only ways to get your ASP.NET Core web app running in Azure, but thanks to the power of the Azure CLI it really is quick and easy to deploy them, and hopefully one of these techniques is a good fit for your application.
 A place for me to share what I'm learning: Azure, .NET, Docker, audio, microservices, and more...






Comments
Hi Mark. How are you doing? Any chance of having a RSS feed on your blog? I use Feedly to manage my tech feeds (I guess many other people do too) and is quite handy to receive the updates there instead of newsletter. Great post by the way! Cheers!
Thiago de Menezes Cristohi Thiago, good to hear from you. The RSS feed is https://feeds.feedburner.co... (feedly should be able to find it automatically)
Mark HeathThanks Mark
Thiago de Menezes Cristo