Four Ways to Transfer Files Into Your Docker for Windows Containers
Docker for Windows makes it super easy to get an IIS server up and running (if you’ve not tried Docker for Windows yet, check out my getting started guide). With the following PowerShell commands, we can get an IIS container running, discover it’s IP address, and launch it in a browser:
docker run -d -p 80 --name datatest1 microsoft/iis:nanoserver
$ip = docker inspect -f "{{.NetworkSettings.Networks.nat.IPAddress}}" datatest1
Start-Process -FilePath [http://$ip](http://$ip)
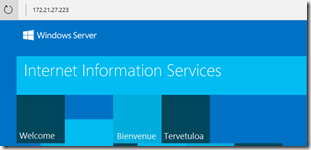
And we can see that our IIS instance is indeed up and running:
But how can we get our own HTML files into our container? Well, Docker gives us a variety of techniques. Let’s look at four.
Technique 1: Edit in the Container
The first technique is the least practical, but demonstrates a very powerful feature of Docker containers. We are not limited to running just one process in them. So while our datatest1 container is running IIS, we can also run PowerShell in it like this:
docker exec -it datatest1 powershell
This gives us an interactive command prompt inside our container.
So we can create our own index.html file in there:
echo "<html><body><h1>Hello World</h1></body></html>" > "c:\inetpub\wwwroot\index.html"
exit
If we refresh our browser, we can see our edit has worked:
Now clearly this would not be a practical way to construct a website, but it does demonstrate that you can connect into a running container and make any changes you need. This is a technique you might use while experimenting with a container, with a view to scripting your manual changes in a dockerfile (see technique 4 below) later.
Technique 2: Copy into a Container
The second technique is to use the docker cp command. This allows you to copy files locally into a container. So I made a local index.html file which I attempted to copy into my datatest1 container
docker cp index.html datatest1:c:\inetpub\wwwroot
But this fails with an error saying the file is in use. In fact, I couldn’t manage to copy any file anywhere while the container was running. I don’t know whether this is a limitation with Windows containers, or if there is a way to get this working, but it does at least work while the container is stopped. Unfortunately this will mean the container will also get a new IP address.
docker stop datatest1
docker cp index.html datatest1:c:\inetpub\wwwroot
docker start datatest1
$ip = docker inspect -f "{{.NetworkSettings.Networks.nat.IPAddress}}" datatest1
Start-Process -FilePath [http://$ip](http://$ip)
If instead of copying a single file, we want to copy the contents of a whole local folder called site into wwwroot, then I couldn’t find the right syntax to do this directly with docker cp, so I ended up changing local directory before performing the copy:
docker stop datatest1
push-location ./site
docker cp . datatest1:c:/inetpub/wwwroot
pop-location
docker start datatest1
$ip = docker inspect -f "{{.NetworkSettings.Networks.nat.IPAddress}}" datatest1
Start-Process -FilePath [http://$ip](http://$ip)
So while docker cp is a useful command to know, it still isn’t the smoothest experience.
Technique 3: Mount a Volume
This next technique is a really nice feature of Docker. Rather than transferring our data into the container, we can make a folder on our local machine visible inside the container by mounting a volume.
We do this with the -v switch on the docker run command, specifying the local folder we want to mount, and the location in which it should appear on the container.
There were a couple of quirks I ran into. First of all, the local path needs to be absolute, not relative, so I’m using Get-Location to get the current directory. And secondly, you can’t mount a volume on top of an existing folder (at least in Docker for Windows). So we sadly can’t overwrite wwwroot using this technique. But we could mount into a subfolder under wwwroot like this:
docker run -d -p 80 -v "$((Get-Location).Path)\site:c:\inetpub\wwwroot\site" --name datatest2 microsoft/iis:nanoserver
And we can see the results in a browser with a similar technique to before:
$ip = docker inspect -f "{{.NetworkSettings.Networks.nat.IPAddress}}" datatest2
Start-Process -FilePath [http://$ip/site](http://$ip/site)
Now the great thing is that we can simply modify our local HTML and refresh the browser and our changes are immediately visible.
So volumes are a really powerful technique, and really come into their own when your container needs to store data that needs to live beyond the lifetime of the container.
But there’s one final technique we need to consider for getting our HTML into our container, and that’s using a dockerfile.
Technique 4: Use a Dockerfile
While volumes are great for data, if you’re planning on deploying your website, you probably do want to bake the HTML into the container image directly. And that can be done by creating your own dockerfile. This is about the simplest sort of dockerfile you can create:
FROM microsoft/iis:nanoserver
COPY site C:/inetpub/wwwroot
All this dockerfile is saying is that our base image is the Microsoft IIS nanoserver image from DockerHub, and then we want to copy the contents of our local site directory into C:/inetpub/wwwroot.
With our dockerfile in place, we need to build an image with the docker build command, giving it a name (I chose datatest4:v1), and then we can create a container from that image with docker run, just as we did before.
docker build -t datatest4:v1 .
docker run -d -p 80 --name datatest4 datatest4:v1
$ip = docker inspect -f "{{.NetworkSettings.Networks.nat.IPAddress}}" datatest4
Start-Process -FilePath [http://$ip](http://$ip)
The great thing about this approach is that now we have an image of our website that we can deploy anywhere.
 A place for me to share what I'm learning: Azure, .NET, Docker, audio, microservices, and more...

Comments
Great example - thank you!
Daniel Williams