How to get Visual Studio 2017 Live Unit Testing working with NUnit tests
Visual Studio 2017 comes with a great new feature called Live Unit Testing. This feature discovers and runs unit tests while you are coding, giving you inline feedback of which tests are passing, and exactly which lines are covered by the tests.
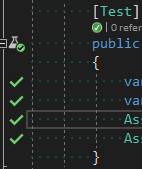
When the tests are passing you see a green tick by each line covered by at least one passing test.
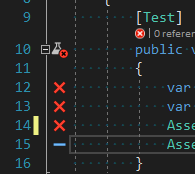
When it fails you see a red cross for each line covered by the failing test, and lines that aren't covered by any tests have a blue dash.
This is a great way to get rapid feedback about the code you're currently writing. I recently attempted to get it working on a large project that had lots of NUnit tests. It's not too difficult, but there are a number of gotchas that you can run into along the way, so here's my notes for what you need to get Live Unit Testing running successfully on a project with NUnit tests.
- You do need Visual Studio 2017 Enterprise Edition, so unfortunately you can't use this with the free Community Edition.
- You need to be using NUnit 3. Our tests were all in NUnit 2 and unfortunately there were quite a lot of breaking changes to work through.
- When you create a new unit test assembly, it should target either the regular .NET framework (e.g. 4.6.2) or .NET Core. Don't try to put your unit tests in a .NET Standard class library - it doesn't work (perhaps because the NUnit3TestAdapter doesn't support .NET Standard).
- Your unit test assemblies need to reference the NUnit (v3) and NUnit3TestAdapter NuGet packages
- It's not enough to have the NUnit3TestAdapter Visual Studio extension installed - that only makes your NUnit unit tests appear in the Test Explorer window. You also need to add the NUnit3TestAdapter NuGet package to your unit test project.
- If you've created a .NET Core unit test assembly you also need to reference the Microsoft.NET.Test.Sdk NuGet package
- There is actually a
dotnet newtemplate you can install so that you can easily create a .NET core unit test assembly with the correct references for live testing in NUnit 3 withdotnet new nunit
- There is actually a
- The Visual Studio Output window with "Live Unit Testing" selected in the dropdown is a good place to look when troubleshooting why Live Unit Testing isn't working for you.
- Live Unit Testing can be started or stopped from the Visual Studio Test menu - it doesn't run automatically.
- You may have some tests you don't want to run as part of the live unit testing. Particularly if they are "integration" tests that might take a long time to run or communicate with external resources.
- You can right-click on tests, classes and assemblies, and include, exclude, or exclude all but this.
- Unfortunately, these settings are stored on a per-user basis so you can't share these settings with the rest of your team.
- There is a special category you can put your tests in called
SkipWhenLiveUnitTestingwhich will exclude them from live testing. It's a shame you can't customize these rules to use the category names you're already using.
- Once you've got it working, I should warn you it's not all plain sailing, especially on a large solution containing thousands of tests. It often seems to get "stuck" where it's not running tests any more, or claim that tests are "excluded" without giving clear reasons why. There are also some cryptic errors in my live unit testing output window about an invalid filter syntax, which I don't know how to resolve. The good news is that on smaller projects it seems very responsive, and hopefully some of the quirky issues will get fixed in the near future.
Here's how quick it picks up changes when you're testing in a small project which is really nice and responsive. I don't even need to save the file:

Recommended links for further reading: