How to Unit Test Silverlight Apps
I recently tried writing some unit tests for a Silverlight 4 project. The first barrier I ran into is that the typical way of creating unit tests – create a DLL, reference NUnit and your assembly to test, doesn’t work, since you can’t mix Silverlight assemblies with standard .NET assemblies.
The next hurdle is that fact that the Silverlight developer tools do not include a unit testing framework, and searching for Silverlight unit testing tools on the web can lead you down a few dead ends. It turns out that the thing you need is the Silverlight Toolkit. If you are just doing Silverlight 4, you only need the April 2010 toolkit.
Once this is installed, you get a template that allows you to add a “Silverlight Unit Test Application” to your project. This is a separate Silverlight application that contains a custom UI just to run unit tests.
Now you can get down to business writing your unit tests. You have to use the Microsoft unit testing attributes, i.e. [TestClass], [TestMethod], [TestInitialize]. You can also use the [Tag] attribute, which is the equivalent of NUnit’s [Category] to group your unit tests, allowing you to run a subset of tests easily.
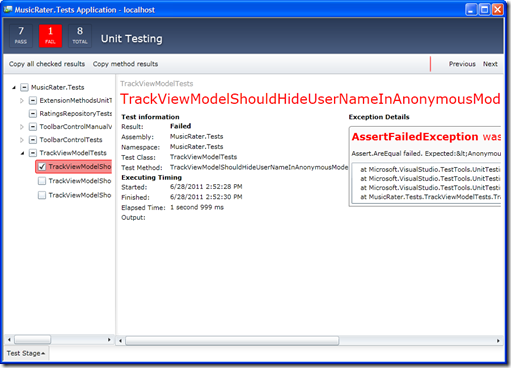
It has a fairly nice GUI (though not without a few quirks) that displays the outcome of your tests for you, and allows you to copy the test results to your clipboard:
Unfortunately it doesn’t support Assert.Inconclusive (gets counted as a failure), but apart from that it works as expected.
Testing GUI Components
Another interesting capability that the Silverlight Unit Testing framework offers is that it can actually host your user controls and run tests against them.
Unfortunately some of the documentation that is out there is a little out of date, so I’ll run through the basics here.
You start off by creating a test class that inherits from the SilverlightTest base class. Then in a method decorated with the TestInitialize attribute, create an instance of your user control and add it to the TestPanel (a property on the base class, note that it has changed name since a lot of older web tutorials were written).
[TestInitialize]
public void SetUp()
{
    var control = new MyUserControl();
    this.TestPanel.Children.Add(control);
}
Note that if you don’t do this in the TestInitialize method and try to do it in your test method itself, the control won’t have time to actually load.
There is a nasty gotcha. If you user control uses something from a resource dictionary, then the creation of your control will fail in the TestInitialize method, but for some reason the test framework ploughs on and calls the TestMethod anyway, resulting in a confusing failure message. You need to get the contents of your app.xaml into the unit test application.
I already had my resource dictionaries split out into multiple files, which helped a lot. I added the resource xaml files to the test application as linked files, and then just referenced them as merged dictionaries in my app.xaml:
<Application.Resources>
    <ResourceDictionary>
        <ResourceDictionary.MergedDictionaries>
            <ResourceDictionary Source="MarkRoundButton.xaml"/>
        </ResourceDictionary.MergedDictionaries>
    </ResourceDictionary>
</Application.Resources>
Now in your actual test method, you can now perform tests on your user control, knowing that it has been properly created and sized.
[TestMethod]
public void DisplayDefaultSize()
{
    Assert.IsTrue(tc.ActualWidth > 0);
}
There are also some powerful capabilities in there to allow you to run “asynchronous” tests, but I will save that for a future blog post as I have a few interesting ideas for how they could be used.
 A place for me to share what I'm learning: Azure, .NET, Docker, audio, microservices, and more...
Comments
Hello Mark, are you working on a music rating tool?
Pierre MengalYes, I have a simple music rating app (https://github.com/markheath/musicrater) I use for listening to the KVR OSC contest entries.
Mark H